Showing posts with label inking. Show all posts

Thursday, February 2, 2012

Challengers ASSEMBLE ! Week 4 - Panel Re-Creation - Process

So last weeks theme on the sketch blog was panel recreation. We had to choose a panel (or panels, in my case) from a comic we read the previous week and re-create/reinterpret it. I happened to be reading NORTHLANDERS Vol 1 - Sven the Returned, by one of my favorite writers, Brian Wood, and amazing artist Davide Gianfelice. The particular page I chose was from issue #6, page 5. I decided to this blog post to show my process from beginning to end of the piece. Here goes :


PREPARATION

 I start by by getting my workspace (aka coffee table) and materials together. I have my source material, a sheet of 8.5x11 Strathmore smooth bristol, my pen/pencil case loaded with numerous weapons, a small plastic t-square, circle templates, and of course way too much caffeine.


The first thing I do on the board is take my t-square and rule out my working area with a 2mm pencil. For this particular piece I'm doing basically a comic page, so at this point I also rule out my panel borders. Since I'm doing some hand lettering as well, I also use my circle templates to place word balloons so I know where I have to work around them.


PENCILS

After everything is ruled out and set to go, I go directly into penciling. I typically use 2 pencils for this process, .7mm and .4mm Pentel Graphlet drafting pencils. I really like the grip and the sturdy feel of these pencils, and they're small enough to give me good, tight lines. For a lot of the pieces I've been doing recently, I basically do a pretty rough sketch and then add most of the detail in the inking process. For this piece however, there is quite a bit of detail involved, so I decided to do tighter pencils to help avoid mistakes when inking. Here's a few detailed shots of the penciling process :

And here's how the full page looks after the penciling is complete :


LETTERING


One thing is for sure, lettering is not my thing. My handwriting is not the worst in the world, but it's pretty dreadful. Anyway, I just used a small ruler to measure everything out, and then the .4mm pencil the write in the words. The only thing I'm unhappy with in this piece is the lettering.


INKING

The first thing I do in the inking process is ink the page & panels borders, and also the word balloons and dialog boxes. For this I used a .5mm Copic Multiliner SP. I love these pens, and I'll use them a lot for fine and technical lines in a lot of my work. I also used these to ink the lettering on the page.
After that, it's in to inking the body of the piece. In this case, I worked from panel to panel, left to right & top to bottom. My favorite tool for inking is the Pentel Pocket Brush Pen.  I love this thing. It makes great lines, the brush tip never loses shape, and best of all it's refillable ! I also use various sizes of Kuretake disposbale brush pens when i want to work in some smaller detail. All of these are filled with permanent, archival quality india ink.


I usually start each panel by outlining all the black areas that need to be filled in :
And then add some detail :
And then fill in all my black shaded areas :
When all the ink is on the page, I go over the entire page with a white rubber eraser to eliminate all traces of the penciling that I worked so freaking hard on :( Then, at last we have our :


FINAL PIECE
I'm really happy with the way this turned out. I really enjoy this series, and I wanted to make sure I did Gianfelice's art justice. In my eyes, I was able to pull that off.


Make sure you head over to Challengers ASSEMBLE! to check out all the great artwork that's been posted there so far. I've really enjoyed doing this for the first month so far. It's helping me be more creative with my art, and I've been able to draw things that I wouldn't necessarily do on my own. This weeks theme is Image Comics, and the new art will be posted on Friday. For my piece I've chosen my favorite Image series of all time, which is...... a surprise ! Well, until tomorrow anyway.

I hoped you enjoyed this look into my process. If you have any questions, comments, critiques or suggestions please feel free to leave them in the comments section below this post,

Thanks for reading !

Thursday, October 20, 2011

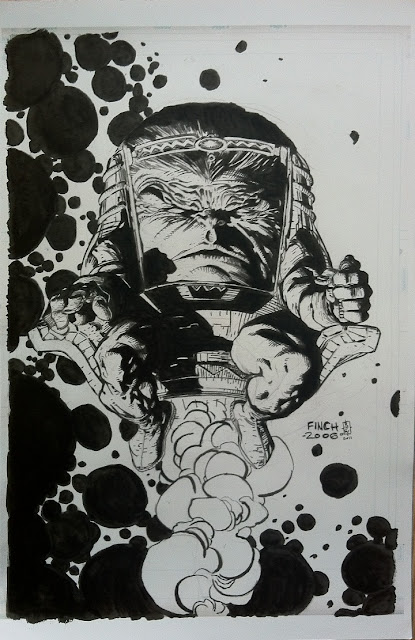
INKING MODOK - FINAL

Here's the final inks for Kasra Ghanbari's MODOK commission by David Finch. This was probably about 6-7 hours of work altogether, about 30 minutes to an hour at a time. The paper I had it printed on was not the best quality, so I had to go over most of it twice. I used a Pentel Pocket Brush Pen for most of the piece. I used Copic Multiliners for all of the straight technical lines, and just a regular paint brush & ink to fill in the crazy bubbles. It's by no means perfect, but I still like the way it ended up. I really enjoyed doing this piece ! Hope you all enjoy it (especially you, Kasra) !